To understand how to measure blood pressure at home, you need to understand the rules for performing the procedure. They are compiled in order to obtain the most accurate result. The rules for measuring blood pressure look like this:
- Before the procedure, you need to relax and preferably rest for half an hour, since you need to measure your blood pressure in a state of complete calm. Otherwise, the indicators will be overestimated.
- If blood pressure is measured in children, then before the procedure the child needs to explain its features and ask him to sit quietly.
- The methods for measuring pressure on the arms and legs are not particularly different. The cuff must be placed on the thigh, and pulse tones can be heard in the popliteal cavity. However, many cannot understand how to correctly measure the pressure on their legs due to the large difference in the indicators. This is due to the structure of the muscles and the characteristics of the blood circulation of the lower extremities, so it is better for beginners to determine blood pressure in their arms.
- Correct blood pressure measurement is carried out in a well-ventilated area at normal temperature. If it’s hot, the vessels will expand and the readings will be too low, but if it’s cold, they will narrow, and the result will be high.
With arterial hypertension, a person’s condition worsens. He experiences headaches, weakness, shortness of breath, chest pain and numbness in his limbs. If the problem occurs for the first time, then you need to consult a doctor. He should tell you how to correctly measure blood pressure and what this manipulation is. Gradually the patient will get used to this procedure and learn the algorithm of actions by heart.
If a patient has hypertension, then it is important to know not only how to measure blood pressure, but also how often it should be done.
It is advisable to do this at least 2 times a day and write down the results. It will be more accurate if blood pressure is measured at the same time 3 times in each arm with a break of 2 minutes.
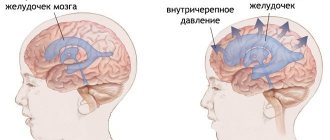
Why do you need to measure blood pressure?
Blood pressure is the force of blood with which it acts on the walls of arteries and blood vessels.
There are diastolic (lower) and systolic (upper) pressure. The norm for an adult is around the boundaries of 120 to 80 mmHg. Significant deviations from these figures often signal the emergence of some disease. Jumps in blood pressure increase the risk of heart attack, ischemia, and stroke.
Increased levels can be observed with the development of the following pathologies:
- heart rhythm disturbances;
- vascular diseases;
- renal failure;
- endocrine diseases;
- neurological disorders.
Low blood pressure is caused by: internal hemorrhages, heart failure, aggravated stomach ulcers, stress, vegetative-vascular dystonia, depression.
It is worth noting that reduced levels may be an individual characteristic of the body. However, high blood pressure almost always signals problems in the body.
To find out exactly the reasons for the jumps, you need to regularly monitor your condition, take measurements, and be examined by a doctor.
Choosing a hand for measuring blood pressure
Many people are concerned about the question: on which hand the pressure is measured, because the accuracy of the final numbers may depend on this. Doctors advise taking measurements on both limbs, and then doing another circle. Before measuring the pressure 2 times, you need to wait 3-4 minutes. The results obtained should be recorded. They will help you choose which arm to measure the pressure on correctly, since from now on it will be possible to carry out the procedure on the limb on which the readings were too high.
Sometimes blood pressure readings in both limbs are the same. In this case, you can understand on which hand to measure the pressure based on other criteria, for example, whether a person is right-handed or left-handed.
If the right limb is used predominantly, then the measurement should be carried out on the left, and vice versa.
Pressure measurement methods
There are 2 types of manipulations for measuring blood pressure: direct and indirect. The direct method is highly accurate, but physically traumatic. A pressure gauge needle is inserted into the wall of the heart or artery. The tube of the device is filled with an anti-clotting agent. The scribe records blood pressure fluctuations in the form of a curve. The technique is used by cardiac surgeons, sometimes in laboratory conditions.
Indirect pressure measurement is a non-invasive method. The measurement is carried out on the peripheral vessels of the elbow or wrist using a tonometer. There may be errors, but the device can be used in any conditions.
Indirect diagnostics of pressure according to the type of technology used (mechanical, electronic) is divided into auscultatory and oscillometric options.
Auscultatory method
Also known as the Korotkoff method. Named after its inventor, surgeon N.S. Korotkova. Mechanical tonometers are used. The cuff is secured to the shoulder and inflated with air through a pear-shaped balloon. The upper and lower limits of pressure are determined by ear using a phonendoscope.
When the cuff is inflated, the blood flow in the artery is blocked, the external pressure exceeds the systolic pressure, and the characteristic sound pulsation stops. The gradual release of air restores blood movement, and tones begin to be heard again. The first beat corresponds to systal (upper) pressure, the last – diastolic (lower).
The Korotkov method is recognized as standard. It has its positive and negative sides. Even an accidental hand movement will not affect the result. However, there is a risk of incorrectly applying the cuff and stethoscope. The objective determination of pressure indicators can be interfered with by noise in the room. The device consists of many parts; during its use, a considerable number of manipulations are expected, so you need to learn how to measure pressure correctly.
Oscillometric method
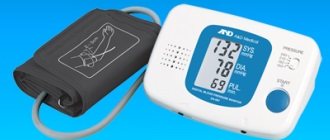
Electronic tonometers with automatic or semi-automatic control are used. The cuff is attached above the elbow or on the wrist. In a fully automatic system, air is drawn in and released independently. In a semi-automatic machine, you must use a bulb. The indicators are displayed on the display without outside help based on the recorded pulsation.
The advantages of this method include the rapid preparation of the electronic device for operation. In addition, working with it does not require special skills, there is no error in human attention, and the noise in the room is not important.
In order for the indicators to be determined correctly, the hand must be motionless while measuring pressure. It is also forbidden to talk during the procedure.
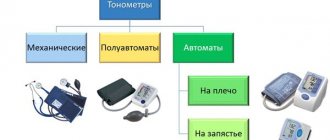
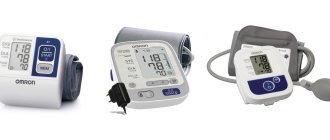
Types of tonometer
The types of blood pressure meters are:
| View | Description, features |
| Mechanical, also known as aneroid, manual | You can check the correctness of the indicators in the same ways as for all types of such devices. Inside the mechanics, similar to a pressure gauge: a spring part or bellows (usually) connected to a pointer on the scale. Mechanical devices are extremely rarely calibrated and break down, much less often than electronic versions; they work for decades without problems due to the thoroughness and simplicity of their design. These are more repairable products. In addition to the above, their adjustment is extremely simple - with an adjusting bolt near the bellows. |
| Mercury based on mechanical processes: the pressure arising in the cuff presses on a column of mercury in a flask on a graduated jackal. These types of blood pressure meters are used less frequently. | |
| Electronic (automatic) | They have an oscillometric electronic measuring system. Inside there is a special sensor with a measuring chamber that reacts to air pressure. If this camera is broken and deviations occur because of this, then it can be repaired. You can also buy a similar element from service companies and replace it yourself by removing the cover of the tonometer and inserting a new one into its seat instead of the old part. |
| Semi-automatic (electronic-mechanical). These are the same electronic devices, but the cuff must be inflated manually using a bulb. |
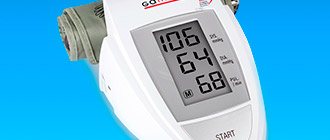
There are advanced devices with voice messages on the market:
How to measure pressure correctly
The most accurate result of this diagnosis can be obtained by following certain rules. Distorted indicators will not provide the necessary information content and may lead the patient and doctor to a false conclusion.
Preparation for the procedure
It is recommended to measure blood pressure an hour or more after fitness or smoking. Coffee, tea, energy drinks, a hot shower or bath require you to wait 1.5-2 hours. You should also wait 15-20 minutes. after eating.
It is advisable to empty the bladder and intestines before measuring pressure.
Before starting the diagnosis, you need to sit or lie down for 2 to 10 minutes. The posture during the measurement process should be relaxed, sitting, legs not crossed, not tense. The cuff should be placed correctly on the arm at the same level as the heart. The patient must remain silent.
Before measuring pressure, it is recommended to ventilate the room and ensure a comfortable air temperature.
Mechanical measurement algorithm
- Prepare the device. Remove the tonometer from the packaging and place the meter on a flat surface, ensuring a good view of the dial. Straighten all the tubes.
- Put on the cuff. Wrap the material around your bare forearm (2-3 cm above the elbow). Fasten tightly, but not too tight.
- Install a phonendoscope. Place the membrane under the cuff just above the elbow (on the inside of the arm). Insert headphones into your ears.
- Inflate the cuff. Take the bulb in your palm and tighten the valve tightly in a clockwise direction until it stops. Squeeze the bulb with quick movements until the cuff is filled with air and the monometer needle reaches 180 mm Hg. At this stage, a slight numbness of the arm may be felt due to blockage of blood flow in the artery.
- Start the measurement itself. Slowly open the bulb valve counterclockwise, gradually releasing air. In this case, it is necessary to monitor the dial needle and the tone in the ears. The first beat heard will occur at the systolic pressure mark, the last one at the diastolic pressure mark. Remember these indicators.
- Finish the procedure. As soon as the beats in the headphones have completely stopped, you can deflate the remaining air, remove the cuff and stethoscope, and put away the device.
If you were unable to listen to the readings, you can inflate the cuff again during the measurement process. You cannot repeat the manipulation more than once, because this distorts the data.
Electronic measurement algorithm
- Preparing the device. Place the tonometer body on a flat surface and straighten all the tubes well.
- Prepare your hand. Take off your watches, bracelets, roll up your sleeves.
- Put on the cuff. Place the fabric on the forearm above the elbow 2 cm.
- Patient preparation. Take a relaxed sitting position with straight legs. Keep your hand calm, it is better to rest it on the table with your palm up. Shut up and breathe evenly for about 30 seconds.
- Measurement. Press the start button according to the instructions. The cuff will begin to inflate and running numbers will appear on the screen. Without changing position, wait until the air is completely deflated and the readings on the monitor stabilize.
- Remove the device. Remove the cuff and stop the device.
When measuring with a wrist tonometer, you should also remove jewelry from your hand and expose your skin. The cuff is put on with the display up 1 cm above the hand. The hand with the device is placed palm down on the opposite shoulder. This is followed by startup, inflation of the cuff, appearance of indicators and deflation.
For maximum accuracy, the diagnosis can be repeated after 15 minutes.
Connect two blood pressure monitors to one cuff and compare readings
You will need 2 sphygmomanometers (borrow from neighbors, etc.), one of which, properly calibrated, will be the standard. The devices are connected alternately to one cuff and the indicators are compared. If the readings of the device compared with the control device differ, then it requires adjustment. In this way, even the smallest errors can be identified.
Parallel connection
This method is an improved and more convenient modification of the previous one. This method can be used for most models - for those with separate pads connected by a tube to the meter body. You will need a homemade adapter or a splitter from a dropper to connect two tubes through it to one cuff hose.
That is, in this case, the sphygmomanometers are combined with a splitter (as in the photo above). Small tubes are connected to them from its side outlets, and the lining hose is attached to the central spout of the adapter. The algorithm is simple: tonometers are connected, measurements are taken, and the readings of two devices are compared online simultaneously.
The advantage of testing a tonometer at home by connecting two devices in parallel is that it becomes possible to observe the spread of values displayed by two products simultaneously. The disadvantage of this procedure, like the previous one, is that it is impossible for models with an integrated cuff (as in the photo below), immediately in their composition, which cannot be separated.
These are often electronic compact sphygmomanometers; the pad in them is put on the hand immediately along with the body.
The splitter (adapter) can be taken from a dropper, from aquarium compressors, or glued together from the bodies of ballpoint pens. The tubes can be taken from the specified equipment, and instead of them you can even use rubber winding from unusable power cords of household appliances, extension cords, removing the wiring from them.
Measurement errors
An important condition is not to touch the phonendoscope membrane and cuff with your hands during the measurement process. Pulse from holding fingers will distort the readings. The tissue between the skin and the cuff interferes with the membrane's receptivity.
You cannot deviate from the level of the heart in the position of the cuff; the numbers will turn out to be too high or too low. The same result will be achieved if the Velcro is fastened too loosely or too tightly, a tired state, a hunched back, or the patient moving and talking.
When using a mechanical tonometer, you should not choose to round the indicators to 0 and 5. Only the actual data shown is taken as truth.
To which institutions can blood pressure monitors be taken for testing?
A tonometer is a measuring device and, like all such devices, requires special maintenance. Official, with written confirmation, inspections, verifications, adjustment procedures, calibration are carried out by specialized institutions accredited by the state (the list is on the Rosstandart website) for the maintenance of measuring instruments, or standardization and metrology centers (TSMS). The listed enterprises are contacted when it is necessary to check a large number of products, when an official conclusion is required, a guarantee of their serviceability, confirmation of maintenance, for example, for equipment in clinics and medical institutions.
But any user can also contact special SM enterprises; the services are not always free, although they often hold promotions for the population without charging a fee. Nevertheless, methods of how to check the accuracy of a tonometer with your own hands at home remain always relevant: such a procedure can be carried out without wasting effort or time visiting institutions.
So, adjustment and accuracy analysis can be carried out independently or in any institutions that have special testing equipment (services, clinics, large pharmacies).
Interpretation of indicators
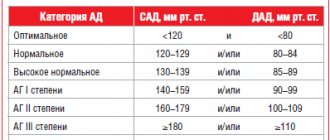
The blood pressure of an adult is distributed by doctors as follows:
- optimal. 120 by 80 units and slightly lower;
- normally acceptable. Up to 130 to 85;
- moderately elevated. Up to 139 to 89.
Numbers above the moderately elevated limit indicate hypertension.
Children's blood pressure may have different standards depending on age; they are determined by the doctor.
Calibration of the electronic blood pressure monitor
Let's look at how to set up a tonometer and its adjustment using the Microlife BP A50 product as an example. The first stage is to unscrew the bolts of the cover and remove it:
The procedure is similar for all models with a similar measuring chamber as in the hand of the master in the photo below (the majority of them are the same, the element is the same, this is the standard, only the standard sizes and mounting differ):
Every electronic device has a regulator inside (some have a selector outside, but such models are rare). This element is also as similar as possible for different models. It is a simple trimmer with a small plastic selector, often with a cutout for a flathead screwdriver.
You will need a head from a mechanical tonometer:
In our case, the model is semi-automatic, so the pear is included. You will also need a tee. Here the master made it from scrap materials. You can take hollow ballpoint pen bodies and glue them with silicone or other glue.
We connect the tubes as in the photo below:
The cuff is placed on a plastic bottle of water to create some kind of load:
Take out the batteries, press the off/on button, hold it down and, holding it like that, insert the battery:
The button is pressed (that is, it must be held down when inserting the battery), the automatic tonometer switches to the calibration mode, which may be accompanied by a sound signal, the readings are automatically set to 0 (the device has been calibrated to zero).
We inflate the bulb, clamp its valve, and slowly release the air:
We compare the indicators of the mechanical head (here it acts as a controller), in this case it is necessary to clamp the hose so that there is no bleeding, to stabilize the indicators. In our case, there is a spread: on the control panel 210, on the scoreboard 206, with further bleeding the discrepancy is 180/177, and so on. The discrepancy is nonlinear, since up to 100 the electrotonometer is calibrated normally, that is, after 100 the values level out, but this is insignificant and does not reduce the need for adjustment.
We turn off the device and experimentally, by moving the regulator (remember, this is an ordinary variable resistor, not the sensor/pressure chamber itself), we find the correct value. You can turn it in any direction, but you need to remember how much you moved the selector. Then we perform the manipulation described above: turn it on, look at the magnitude of the discrepancy.
The specified calibration is carried out until the indicators of the controller and the indicators on the scoreboard coincide as much as possible. That is, through experimentation, at random, trial and error. But if you remember how much you turned the selector, then you can achieve the desired result after 3-4 cycles of such manipulations. Before each, you need to reduce the pressure to 0, bleed the air from the cuff completely.
Pressure monitoring
Monitoring refers to repeated measurements over a certain period. This practice is used to select the right medications, control pregnancy, and certain diseases. The doctor may prescribe diagnostics at regular intervals, at set hours, require you to keep a blood pressure diary or wear a smart blood pressure monitor with a memory function. The latter option is more expensive, but is convenient for recording more than 100 indicators with the date and time of measurement without the participation of the patient.
Determining blood pressure using devices is used everywhere in everyday life and medicine. Different tonometers have their own errors and advantages. It is better to buy a specific type after consulting a supervising doctor, taking into account the situation.
The need to check the tonometer for accuracy
When using a tonometer, it is important to be able to maintain it, know how to identify errors and adjust it. As standard, new out of the box, the blood pressure meter is already calibrated and ready for use after unpacking without any manipulation.
Although less common, there are devices that need to be adjusted before use, for example, if the product was stored in a warehouse for a long time, experienced factors that reduce accuracy (temperature changes, etc.) or initially had deviations.
But basically, checking the tonometer and monitoring the correctness of the measurements is required after a certain period of using the device, and also even if it was used only a few times, after which it was stored idle. If the device is electronic, then over time faults appear in its circuits, and the mechanical parts also “get tired”. Such phenomena are natural and do not mean a breakdown.
Checking and calibrating the tonometer will also be required after its repair.
Calibration of a mechanical tonometer
If errors appear in mechanical sphygmomanometers, this is always associated with a springy corrugated shell - a bellows, to which the arrow with a holder is attached. The mechanism is adjustable.
Calibration is extremely simple:
- connect a correctly adjusted tonometer and the device requiring adjustment in parallel to one cuff (the best option) or alternately;
- Then the calibration itself is simple: adjust the spring with pliers and pliers using the adjusting bolt, which is located at the base of the cylinder with the bellows (the lower part near the segment with the scale). The design always provides for this possibility.
Additional device features
Modern meters are distinguished by the presence of additional functions that may be useful, or may not be used by a person at all. Therefore, before purchasing, you should study the capabilities of the device and purchase a device with a set of optimal, rather than unnecessary, options that affect the cost of the equipment.
Standard blood pressure in humans
- PAD technology. Allows you to record and display data on unstable heartbeat (arrhythmia).
- MAM technology. In 2 minutes, the device takes 3 consecutive measurements, calculates the average values without having to remove the cuff and take breaks between measurements.
- Artificial intelligence Intellisense, Fuzzy Logic function. Makes indicators as accurate as possible, and the process of obtaining them comfortable. By creating optimal pressure, pain from squeezing the hand is reduced.
- Measurement quality control system.
- Alert timer.
- Clock and calendar.
- Built-in memory.
- Automatic shutdown and battery saving system.
“Talking” pressure meters are relevant for visually impaired people
No ads 1