Artificial respiration (AR) is an urgent emergency measure if a person’s own breathing is absent or impaired to such an extent that it poses a threat to life. The need for artificial respiration may arise when providing assistance to those who have received sunstroke, drowned, suffered from electric current, as well as in case of poisoning with certain substances.
The purpose of the procedure is to ensure the process of gas exchange in the human body, in other words, to ensure sufficient saturation of the victim’s blood with oxygen and the removal of carbon dioxide from it. In addition, artificial ventilation has a reflex effect on the respiratory center located in the brain, as a result of which independent breathing is restored.
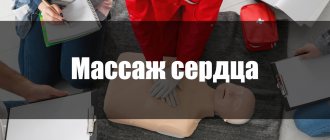
Mechanism and methods of artificial respiration
Content:
- Mechanism and methods of artificial respiration
- Indications and contraindications
- Preparing for artificial respiration
- Artificial respiration from mouth to mouth
- Artificial respiration from mouth to nose
- How long does artificial respiration last?
- Features of the procedure in children
- Manual methods of artificial respiration
- Hardware artificial respiration methods
- Complications of artificial respiration
Only through the process of breathing does a person’s blood become saturated with oxygen and carbon dioxide is removed from it. After air enters the lungs, it fills the lung sacs called alveoli. The alveoli are pierced by an incredible number of small blood vessels. It is in the pulmonary vesicles that gas exchange takes place - oxygen from the air enters the blood, and carbon dioxide is removed from the blood.
If the body's supply of oxygen is interrupted, vital activity is at risk, since oxygen plays the “first fiddle” in all oxidative processes that occur in the body. That is why, when breathing stops, artificially ventilating the lungs should be started immediately.
The air entering the human body during artificial respiration fills the lungs and irritates the nerve endings in them. As a result, nerve impulses are sent to the respiratory center of the brain, which are a stimulus for the production of response electrical impulses. The latter stimulate contraction and relaxation of the diaphragm muscles, resulting in stimulation of the respiratory process.
Artificially supplying the human body with oxygen in many cases makes it possible to completely restore the independent respiratory process. In the event that cardiac arrest is also observed in the absence of breathing, it is necessary to perform a closed cardiac massage.
Please note that the absence of breathing triggers irreversible processes in the body within five to six minutes. Therefore, timely artificial ventilation can save a person’s life.
All methods of performing ID are divided into expiratory (mouth-to-mouth and mouth-to-nose), manual and hardware. Manual and expiratory methods are considered more labor-intensive and less effective compared to hardware methods. However, they have one very significant advantage. They can be performed without delay, almost anyone can cope with this task, and most importantly, there is no need for any additional devices and instruments, which are not always at hand.
Resuscitation technique: maintaining breathing and circulation artificially
Supplying the lungs with oxygen
Oxygen can be supplied to the lungs in various ways, but in any case two conditions must be met.
The airways must be clear. The cause of death for many people was the retraction of the tongue back, blockage of the airways with aspirated secretions from the stomach. The second condition is that oxygen must be introduced into the respiratory tract at appropriate pressure. Oxygen blown through the mouth or pharynx does not always reach the alveoli, but gas exchange occurs only there. In Hungary, about 1,500 people die annually in accidents, and a large percentage of them are not due to the severity of injuries that would be incompatible with life, but simply from suffocation, as a result of the fact that the airways are closed by a tongue, blood, or secretions that have sunk back , stomach contents.
That is why the immutable rule is that resuscitation should in any case begin with the release of the airways. To do this, the “deceased” is placed on his back and kneeled to his right. The patient's head is thrown back sharply, with our left hand we open his mouth and keep it open. If the mouth is full of saliva or stomach contents, it should be cleared of these contents by wiping the saliva or removing the contents with your fingers. The second and third fingers of the right hand are inserted into the entrance to the larynx to determine if there is any foreign body there. If resuscitation is started in a hospital setting, we, of course, have a laryngoscope and a suction pump at our disposal. If they are not there, then the above movements themselves can often save the patient’s life.
The simplest method of inhaling oxygen is to breathe mouth to mouth or into the patient's nose. We all constantly carry with us a wonderful high-pressure oxygen cylinder - these are our air-filled lungs. With forced exhalation, you can easily achieve an excess of 50-100 mm Hg above normal pressure. Art., which is quite enough to inflate the lungs of a non-breathing person. To do this, the head of the patient lying on his back is sharply thrown back, the patient’s nose is pinched with his left hand so that the blown air cannot escape through the nose, then, putting his mouth to the victim’s mouth on the widest possible area of it, they rhythmically blow air into his lungs, making 16– 20 exhalations per minute. Between two blows, the mouth is taken away from the patient's mouth for a moment to allow the inflated air to escape from his lungs. Many people prefer the method of blowing air into the patient’s nose, while his lips are compressed by the hand of the resuscitator.
The described method is far from hygienic and very unpleasant, but all the more effective. If there is opportunity and time, a handkerchief, a piece of gauze, bandage, etc. is placed on the mouth of the person being resuscitated, blowing air through them. The use of the Safar tube frees you from all the troubles associated with blowing air from mouth to mouth. You can easily make it yourself by connecting two Mauo tubes in the opposite direction. The resuscitator takes one end of the tube into his mouth, and the other end is inserted into the “dead” person’s mouth. Using a tube, you can blow air into the lungs of the person being resuscitated under high pressure. This is an instrument that can easily be used by those who do not understand anesthesiology, and therefore it is advisable to store a lot of such tubes everywhere (in the operating room, in the waiting room, where bronchoscopy, rectoscopy is performed, etc.).
Of course, the easiest way to introduce air (oxygen) into the lungs of the patient (“dead”) is through the tracheal tube. However, where there is such a tube, as a rule, there is also an anesthesia apparatus, from which it is much easier to give pure oxygen. Therefore, in extreme cases, the tracheal tube can be used to make several injections through it until the anesthesia machine is connected and artificial ventilation with oxygen begins.
Somewhat more effective than mouth-to-mouth breathing is the use of an Ambu cylinder and mask; they can be used to blow clean or oxygen-enriched room air into the lungs of the person being resuscitated. If the airways are clear, you can perform artificial respiration through a mask for a long time.
Transport of oxygenated blood from the lungs to brain cells
The human heart, strictly speaking, is nothing more than a pump, the active contraction and passive relaxation of which maintains blood circulation. If the heart stops in diastole or due to ventricular fibrillation, then its ability to relax remains unchanged, but active contraction can be caused by external pressure. This external pressure is called cardiac massage. With its help, active contraction of the heart can be caused over a long period of time, over many hours. The various methods of cardiac massage are described below.
External (indirect, transsternal) cardiac massage
This method was described by Kon-wenhoven, who developed it, in 1960, and since then it has been widely used throughout the world. The method is very simple. The palm of one hand is placed on the lower part of the sternum of the person being resuscitated, lying on his back, and the second hand is placed on the back of it almost at a right angle. With both hands, with sharp, sudden movements, press on the sternum 60-70 times per minute. In this case, the sternum should drop by 3-5 cm. The arms should move only at the elbow joint so that the pressure of the body weight of the person performing resuscitation can be used.
The pressure should be applied with such force that the heart, squeezed between the sternum and the spine, can push out the blood, but neither the sternum nor the ribs should be damaged, nor should the liver be damaged. In children whose osteochondral chest wall is very elastic, effective cardiac massage can be performed without the application of great force. In elderly patients with emphysema and an inflexible chest wall, it is often necessary to apply such force that it is almost impossible to avoid breaking one or two ribs.
The effectiveness of external cardiac massage can be increased in various ways. The easiest way to achieve this is to place the patient on a solid base, for example, placing a board under him and placing him on the floor. If compression of the chest wall is carried out on a solid basis, as if from both sides, the effectiveness of the massage increases.
You can also increase efficiency by constantly pressing one hand on the patient’s stomach; this can be done by an assistant. This simple way provides comprehensive assistance in intensive care:
- first of all: by pressing on the patient’s stomach, they compress the inferior vena cava and thereby prevent the flow of blood from the right atrium towards the abdominal cavity while squeezing the chest;
- the diaphragm is fixed in its high position, which prevents part of the pressure exerted on the chest from being spent on displacing the diaphragm downward, increasing intra-abdominal pressure;
- By squeezing the stomach, we prevent some of the air blown into the victim’s mouth from going into the stomach and inflating it.
In addition, compression of the abdominal aorta promotes more efficient blood circulation in the head and torso.
It is possible to apply constant pressure on the victim's abdomen - especially if it is a child - without the help of an assistant. At the same time, the sternum is compressed with one hand, and the other constantly presses on the stomach. It is better, however, especially in adults when great force is required, for cardiac massage to be performed with both hands, and pressure on the victim’s abdomen to be applied by another person.
Internal (direct, transthoracic) cardiac massage
In cases where closed cardiac massage fails to maintain or restore blood circulation, open cardiac massage may be indicated.
The chest cavity is opened in the IV, V or VI intercostal space on the left side. One incision cuts through the skin and muscles covering the bony chest wall, and the second opens the chest cavity in the intercostal space. At this time there is no blood pressure, and therefore there is no bleeding, clamping of blood vessels, and no ligatures are required. The intervention is carried out in non-sterile conditions, without the required pre-washing of hands and compliance with the mandatory rules of asepsis.
When the left side of the chest cavity is opened, cardiac massage begins through the closed pericardium. Several quick squeezing movements promote the flow of blood into the brain, then the pericardium is opened in front of and parallel to the course of the phrenic nerve and the massage is continued by directly holding the heart in the hands.
Several methods of direct cardiac massage are known and used. If the heart is small, you can take it in one hand, making opposing movements with the thumb opposed to the other four, emptying the ventricles. You can also press the heart against the back surface of the sternum with rhythmic movements.
Cardiac massage with both hands is carried out by placing the right hand behind the heart, and the left hand on its front surface and rhythmically pressing the two palms towards each other. This is the most gentle method.
Whatever massage method we use, we need to ensure that
- systole was replaced by short, confident compressions,
- the ventricles were emptied as completely as possible,
- full diastole was ensured by actively unclenching the palm at the right moment,
- systole occupied approximately one third, and diastole two thirds of the total time of the cardiac cycle,
- in order not to break through the wall of the heart, you need to squeeze it not with your fingertips, but with their entire palmar surface,
- From the first moment of cardiac massage, its effectiveness should be monitored; if it fails, the method used must be immediately changed.
Whatever type of heart massage is performed - external or internal, you can verify its effectiveness if another person at this time feels the pulse above the carotid or femoral artery of the victim. If the compression of the heart we exert is strong enough, then the pulse will be clearly palpable in the above-mentioned arteries, and at the same time, constriction of the pupils will be noted.
During an effective cardiac massage, the wound suddenly begins to bleed, and if the internal mammary artery was also cut during thoracotomy, the blood will begin to spurt out of it. Continuing the massage, it is necessary to clamp and bandage the bleeding vessels. Now we already have time to wash and isolate the skin around the thoracotomy opening, so that the second doctor helping us washes his hands properly, puts on a sterile gown, sterile rubber gloves and takes over further cardiac massage under sterile conditions. It is best if the doctor massaging the heart is changed every 4-5 minutes, so it is good if the massage is performed by two or even three doctors. This not only achieves greater effectiveness of the intervention, but also reduces the possibility of collateral damage.
After successful resuscitation, the chest cavity is washed with an antiseptic or antibiotics, a suction drain is placed in it, and the wound is closed in layers.
The question is often asked: when should the resuscitation physician resort to thoracotomy? Many years of experience show that external and internal cardiac massage contribute approximately equally to the restoration of blood flow. However, with external massage, damage to the chest wall (fractures of the sternum, ribs) is more often observed, while with internal massage, the heart itself often suffers, therefore, after an effective external massage, the work of the heart will be better than after an effective internal massage.
Therefore, we think that in any case of sudden cardiac arrest, it is better to start with external cardiac massage. This rule has only a few exceptions, when it is necessary to immediately resort to internal cardiac massage:
- These are primarily those cases when there are no necessary conditions for external massage, since the chest is inelastic or damaged,
- when the heart stops during chest surgery, and the chest cavity has already been opened, and when the heart itself is damaged. And finally, an immediate transition to internal cardiac massage is necessary if, for any reason, external massage fails to achieve a corresponding increase in blood pressure.
Restoration of spontaneous cardiac activity
If resuscitation is started immediately upon detection of cardiac arrest, there is no longer any reason to rush. You can calmly think about your next steps. The immediate task is to restore spontaneous cardiac activity. The method is selected according to the condition of the heart.
It is possible that the heart has stopped in diastole, and it is possible that ventricular fibrillation is noted. These two conditions can be easily differentiated from each other by electrocardiography or, in the case of an open chest and pericardium, examination of the heart. When the heart stops in diastole, no complexes are visible on the ECG; the heart lies motionless. When ventricular fibrillation occurs, the ECG shows so-called atrial fibrillation waves, and on the surface of the heart there are corresponding vibrating movements with a frequency of 180-250/min. Interestingly, during cardiac massage, each individual compression causes a large deviation on the ECG.
In case of ventricular fibrillation, the magnitude of the atrial waves is a good prognostic sign. The coarser the waves and lower the frequency of ventricular fibrillation, the better the prognosis, and the finer the waves and higher the frequency of fibrillation, the worse the prognosis. Often, under the influence of a short-term massage, the heart moves from a state of large-wave ventricular fibrillation to normal sinus rhythm. You need to pay attention to the color of the heart, because only a well-oxygenated pink heart can be revived.
When the heart stops in diastole, under the influence of a good massage, it can begin to work on its own, resuming blood circulation with corresponding contractions. But it may happen that diastolic cardiac arrest after some time turns into ventricular fibrillation. In this case, you need to do the same as with primary ventricular fibrillation, i.e., perform electrical defibrillation. The essence of electrical defibrillation is to briefly pass an electric current through the heart. The electric shock usually varies in strength depending on the size of the heart. Modern devices are direct current defibrillators, with the help of which a dose of 40-60 W/sec is passed through the heart for internal defibrillation, and 200-400 W/sec for external defibrillation.
In internal defibrillation, the two metal electrodes are usually curved to better fit the heart. If the electrode comes into contact with the heart only on a small surface, then instead of defibrillation, a burn of the heart muscle will occur, as if we had touched it with a diathermy knife.
With an open chest, if the defibrillator electrodes are applied directly to the heart, you must ensure that they touch it with their entire surface and that the heart is moved as little as possible from its place. External defibrillation uses electrodes with a straight surface.
Under the influence of an electric shock, the heart makes a “jump” and clonic convulsions occur in the skeletal muscles. These seizures can be prevented by administration of succinylcholine.
Large doses of medication during resuscitation are more likely to harm than help. Through medication, a twofold goal can be achieved:
- tone the cardiac muscles of a flaccid heart and
- reduce pathological excitability of the heart muscle.
Since these two conditions are mutually exclusive, when choosing drug treatment, one or the other should also be chosen. The most effective means of toning the heart muscles is tonogen (adrenaline). It can be administered intravenously, and with an open chest into any cavity of the heart at a dose of 0.5-1.0 mg. The administration of such doses is repeated every 10 minutes until a total dose of 10 mg is administered. Tonogen helps paralyzed arterioles regain their previous tone. This raises diastolic blood pressure, which in turn increases mean arterial pressure, which determines the degree of blood flow in organs and tissues. In addition, adrenaline also has a positive inotropic effect, helps restore the spontaneous contractility of the heart muscle and, if the heart has resumed activity, increases its strength.
Recently, instead of tonogen or interspersed with it, the heart is toned with the drug isoproterenol - isuprel, because it is a less crude remedy that can be re-administered over a long period of time. Its dilution dose is 0.2 mg intravenously or 0.02 mg intracardially.
Calcium ions (Ca++) also have a beneficial tonic effect on the atonic heart: they immediately and significantly increase the strength of heart contractions. Therefore, calcium should be administered as early as possible. With external massage, it is injected intravenously or through the chest wall with a long needle into the cavity of the heart, with internal massage - directly into the cavity of the left ventricle. A single dose of a 10% calcium chloride solution is up to 20 ml, and it can be administered repeatedly at short intervals.
In order to stop acidosis, in addition to tonics, it is also necessary to introduce a buffer. At low pH, resuscitation is much more difficult than at normal pH (approx. 7.4). Most often, sodium bicarbonate is administered for this purpose, but lactate and THAM (tri-hydromethylaminomethane) can also be administered. As a rule, 1 mEq of buffer is administered per 1 kg of weight, which is the minimum initial dose.
In case of increased excitability of the heart muscle, if ventricular fibrillation cannot be stopped even by repeated electric shocks, the possibility of hypokalemia must be assumed. In such cases, even in the absence of an analysis of potassium content in the serum, 1.0 - even 2.0 g of potassium chloride can be safely administered intravenously or into the heart cavity. Along with this, increased excitability can be reduced with the help of drugs such as lidocaine, procainamide, and inderal.
When using antiarrhythmic drugs, we must not forget that they all reduce the contractility of the heart (the “pump” function) and, naturally, the patient’s blood pressure.>
Indications and contraindications
Indications for the use of ID are all cases where the volume of spontaneous ventilation of the lungs is too low to ensure normal gas exchange. This can happen in many urgent and planned situations:
- For disorders of the central regulation of breathing caused by impaired cerebral circulation, tumor processes of the brain or brain injury.
- For medicinal and other types of intoxication.
- In case of damage to the nerve pathways and neuromuscular synapse, which can be caused by trauma to the cervical spine, viral infections, the toxic effect of certain medications, and poisoning.
- For diseases and damage to the respiratory muscles and chest wall.
- In cases of lung lesions of both obstructive and restrictive nature.
The need to use artificial respiration is judged based on a combination of clinical symptoms and external data. Changes in pupil size, hypoventilation, tachy- and bradysystole are conditions that require artificial ventilation. In addition, artificial respiration is required in cases where spontaneous ventilation is “turned off” with the help of muscle relaxants administered for medical purposes (for example, during anesthesia for surgery or during intensive care for a seizure disorder).
As for cases where ID is not recommended, there are no absolute contraindications. There are only prohibitions on the use of certain methods of artificial respiration in a particular case. So, for example, if venous return of blood is difficult, artificial respiration modes are contraindicated, which provoke even greater disruption. In case of lung injury, ventilation methods based on high-pressure air injection, etc., are prohibited.
First aid for various types of body damage
Wound.
When providing first aid in case of injury, the following rules must be strictly observed.
It is forbidden:
- wash the wound with water or any medicinal substance, cover it with powder and lubricate it with ointments, as this prevents the healing of the wound, causes suppuration and contributes to the introduction of dirt from the surface of the skin into it;
- remove sand, earth, etc. from the wound, since it is impossible to remove everything that contaminates the wound;
- remove blood , remnants of clothing, etc. from the wound, as this can cause severe bleeding;
- Cover wounds with duct tape or webbing to prevent tetanus infection.
Need to:
- the person providing assistance should wash their hands or lubricate their fingers with iodine;
- carefully remove dirt from the skin around the wound, the cleaned area of skin should be lubricated with iodine;
- open the dressing package in the first aid kit in accordance with the instructions printed on its wrapper.
When applying a dressing, you should not touch with your hands the part that should be applied directly to the wound.
If for some reason there is no dressing bag, you can use a clean scarf, cloth, etc. for dressing). Do not apply cotton directly to the wound. Add iodine to the area of the tissue that is applied directly to the wound to obtain a spot larger than the wound, and then place the fabric on the wound;
- contact a medical organization as quickly as possible, especially if the wound is contaminated with soil.
Bleeding.
Internal bleeding.
Internal bleeding is recognized by the appearance of the victim (he turns pale; sticky sweat appears on the skin; breathing is frequent, intermittent, the pulse is rapid and weak).
Need to:
- lay the victim down or give him a semi-sitting position;
- ensure complete peace;
- apply “cold” to the suspected site of bleeding;
- Call a doctor or medical professional immediately.
It is forbidden:
- Give the victim something to drink if there is a suspicion of damage to the abdominal organs.
Preparing for artificial respiration
Before performing expiratory artificial respiration, the patient should be examined. Such resuscitation measures are contraindicated for facial injuries, tuberculosis, poliomelitis and trichlorethylene poisoning. In the first case, the reason is obvious, and in the last three, performing expiratory artificial respiration puts the person performing resuscitation at risk.
Before starting expiratory artificial respiration, the victim is quickly freed from clothing squeezing the throat and chest. The collar is unbuttoned, the tie is undone, and the trouser belt can be unfastened. The victim is placed supine on his back on a horizontal surface. The head is tilted back as much as possible, the palm of one hand is placed under the back of the head, and the other palm is pressed on the forehead until the chin is in line with the neck. This condition is necessary for successful resuscitation, since with this position of the head the mouth opens and the tongue moves away from the entrance to the larynx, as a result of which air begins to flow freely into the lungs. In order for the head to remain in this position, a cushion of folded clothing is placed under the shoulder blades.
After this, it is necessary to examine the victim’s oral cavity with your fingers, remove blood, mucus, dirt and any foreign objects.
It is the hygienic aspect of performing expiratory artificial respiration that is the most delicate, since the rescuer will have to touch the victim’s skin with his lips. You can use the following technique: make a small hole in the middle of a handkerchief or gauze. Its diameter should be two to three centimeters. The fabric is placed with a hole on the victim’s mouth or nose, depending on which method of artificial respiration will be used. Thus, air will be blown through the hole in the fabric.
Invasive ventilation
An endotracheal tube is inserted into the trachea through the mouth or nose and connected to a ventilator.
With invasive respiratory support, the ventilator provides forced pumping of oxygen to the lungs and completely takes over the breathing function. The gas mixture is supplied through an endotracheal tube placed into the trachea through the mouth or nose. In particularly critical cases, tracheostomy is performed - a surgical operation to dissect the anterior wall of the trachea to insert a tracheostomy tube directly into its lumen.
Invasive ventilation is highly effective, but is used only if it is impossible to help the patient in a more gentle way, i.e. without invasive intervention.
Who needs invasive ventilation and when?
A person connected to a ventilator can neither speak nor eat. Intubation is not only inconvenient, but also painful. Because of this, the patient is usually placed in a medically induced coma. The procedure is carried out only in a hospital setting under the supervision of specialists.
Invasive ventilation is highly effective, but intubation involves placing the patient in a medically induced coma. In addition, the procedure is associated with risks.
Traditionally, invasive respiratory support is used in the following cases:
- lack of effect or intolerance of NIV in the patient;
- increased drooling or production of excessive sputum;
- emergency hospitalization and the need for immediate intubation;
- coma or impaired consciousness;
- possibility of respiratory arrest;
- presence of trauma and/or burns to the face.
How does an invasive ventilator work?
The operating principle of devices for invasive ventilation can be described as follows.
- For short-term mechanical ventilation, an endotracheal tube is inserted into the patient's trachea through the mouth or nose. For long-term mechanical ventilation, an incision is made in the patient's neck, the anterior wall of the trachea is dissected, and a tracheostomy tube is placed directly into its lumen.
- A breathing mixture is delivered through a tube into the lungs. The risk of air leakage is minimized, so the patient is guaranteed to receive the right amount of oxygen.
- The patient's condition can be monitored using monitors that display breathing parameters, the volume of supplied air mixture, saturation, cardiac activity, and other data.
Features of equipment for invasive ventilation
Equipment for invasive ventilation has a number of characteristic features.
- Completely takes over the breathing function, i.e. actually breathes instead of the patient.
- It requires regular checking of the serviceability of all valves, because... The patient’s life depends on the performance of the system.
- The procedure must be supervised by a doctor. Weaning the patient from the ventilator also requires the participation of a specialist.
- Used with additional accessories - humidifiers, cough cleaners, spare circuits, suction units, etc.
Artificial respiration from mouth to mouth
To perform artificial respiration using the mouth-to-mouth method, the person who will provide assistance must be on the side of the victim’s head (preferably on the left side). In a situation where the patient is lying on the floor, the rescuer kneels. If the victim's jaws are clenched, they are forced apart.
After this, one hand is placed on the victim’s forehead, and the other is placed under the back of the head, tilting the patient’s head back as much as possible. Having taken a deep breath, the rescuer holds the exhalation and, bending over the victim, covers the area of his mouth with his lips, creating a kind of “dome” over the patient’s mouth. At the same time, the victim’s nostrils are pinched with the thumb and index finger of the hand located on his forehead. Ensuring tightness is one of the prerequisites for artificial respiration, since air leakage through the victim’s nose or mouth can nullify all efforts.
After sealing, the rescuer quickly, forcefully exhales, blowing air into the airways and lungs. The duration of exhalation should be about a second, and its volume should be at least a liter for effective stimulation of the respiratory center to occur. At the same time, the chest of the person receiving assistance should rise. If the amplitude of its rise is small, this is evidence that the volume of air supplied is insufficient.
Exhaling, the rescuer unbends, freeing the victim's mouth, but at the same time keeping his head thrown back. The patient should exhale for about two seconds. During this time, before taking the next breath, the rescuer must take at least one normal breath “for himself.”
Please note that if a large amount of air enters the patient's stomach rather than the lungs, this will significantly complicate his rescue. Therefore, you should periodically press on the epigastric region to empty the stomach of air.
State institution of the Republic of Kalmykia
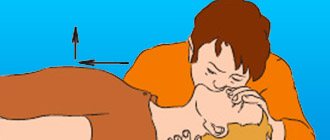
Having freed the hand from under the neck, they move it to the victim’s chin, helping to fix the thrown back head, and with the thumb of this hand they open his mouth. The victim's lower jaw is pulled forward and upward by the chin, thus eliminating the retraction of the tongue. When carrying out this procedure, you must be extremely careful, since sudden and excessive tilting of the head can lead to damage to the cervical spine. Using your fingers, having previously wrapped them in gauze, a handkerchief or other cloth, it is necessary to clean the oral cavity of mucus, saliva, vomit or sputum. The resuscitator pinches the wings of the victim’s nose with two fingers of the hand located on the victim’s forehead, takes a deep breath, tightly clasps the victim’s lips with his lips and exhales air into his mouth (to ensure hygiene, a gauze napkin or handkerchief can be placed on the victim’s lips) (Fig. 134). The victim exhales on his own. During the passive exhalation of the victim, the person providing assistance takes a deep breath. If the victim was unable to open his jaws and open his mouth, artificial respiration can be performed using the “mouth to nose” method (Fig. 135). In this case, the hand holding the lower jaw presses it tightly so that the victim’s lips are tightly closed. The rest of the sequence of actions remains the same as when performing artificial respiration using the mouth-to-mouth method. The frequency of inflation should not exceed 16-20 per minute, optimally 15-17. Every minute you need to stop and check your pulse to make sure it is there. An indicator of adequate artificial respiration is the straightening of the victim’s chest and a gradual change in the color of his skin from gray to pink.
To restore the activity of a stopped heart, indirect cardiac massage is performed. In this way, the pumping function of the heart is artificially maintained. With rhythmic compression of the chest in the anteroposterior direction, blood is pushed out of the chambers of the heart and enters the blood vessels. When the compression stops, the chest, due to its elasticity, expands, returning to its original position, and the heart fills with blood again. To perform chest compressions, the victim must lie on his back, on a hard surface. The resuscitator is positioned on the side of the victim so that his shoulder girdle is at the level of the victim’s sternum. To avoid rib fractures, it is necessary to correctly determine the point of pressure. The massage is carried out with the arms straightened at the elbows, the palm of one of them is placed on the pressure point perpendicular to the longitudinal axis of the body, the other palm is placed on the back surface of the first. The helper's fingers should not touch the chest. The sternum, by means of a sharp push-like pressure, is shifted towards the spine by 4-6 cm and held in this position for about half a second, then released without lifting your hands. You need to press on the sternum not with the force of your hands, but using the weight of your body. The frequency of pressure should be 90-120 per minute depending on the age of the victim, 90-100 for adults, 100 for adolescents. Indirect cardiac massage is considered effective if, with each compression of the chest, a pulse appears in the victim’s carotid, femoral or radial artery. Indirect cardiac massage is performed in combination with artificial respiration. Resuscitation is best carried out by two people - one performs external cardiac massage, and the other performs artificial respiration. In accordance with the recommendations of the European Resuscitation Council, a compression-to-inhalation ratio of 30:2 should be used for cardiopulmonary resuscitation of victims by two rescuers, as well as for resuscitation of adults by one rescuer. The effectiveness of the resuscitation will be indicated by the constriction of the pupils and the appearance of their reaction to light, a decrease in pallor and cyanosis of the skin of the body and its pinkness, restoration of the heartbeat and spontaneous breathing.
If within 30 minutes, with properly performed resuscitation, no changes have occurred in the victim’s body, resuscitation measures can be stopped. Exceptions are made for children and victims of cooling; for them, resuscitation must be continued for up to 30-40 minutes. The decisive sign that allows prolongation of resuscitation efforts is the reaction of the pupils, reflecting the life of the brain. The absence of constriction of the pupils within 10 minutes indicates the death of the victim’s brain, without restoring the functions of which it is impossible to revive the person. Resuscitation actions can also be stopped if their further implementation is associated with danger for both the person providing assistance and for others.
Artificial respiration from mouth to nose
This method of artificial ventilation is carried out if it is not possible to properly unclench the patient’s jaws or there is an injury to the lips or oral area.
The rescuer places one hand on the victim’s forehead and the other on his chin. At the same time, he simultaneously throws back his head and presses his upper jaw to the lower. With the fingers of the hand that supports the chin, the rescuer must press the lower lip so that the victim’s mouth is completely closed. Taking a deep breath, the rescuer covers the victim’s nose with his lips and forcefully blows air through the nostrils, while watching the movement of the chest.
After artificial inspiration is completed, you need to free the patient's nose and mouth. In some cases, the soft palate may prevent air from escaping through the nostrils, so when the mouth is closed, there may be no exhalation at all. When exhaling, the head must be kept tilted back. The duration of artificial exhalation is about two seconds. During this time, the rescuer himself must take several exhalations and inhalations “for himself.”
How long does artificial respiration last?
There is only one answer to the question of how long ID should be carried out. You should ventilate your lungs in this mode, taking breaks for a maximum of three to four seconds, until full spontaneous breathing is restored, or until the doctor appears and gives other instructions.
At the same time, you should constantly ensure that the procedure is effective. The patient's chest should swell well, and the facial skin should gradually turn pink. It is also necessary to ensure that there are no foreign objects or vomit in the victim’s respiratory tract.
Please note that due to the ID, the rescuer himself may experience weakness and dizziness due to a lack of carbon dioxide in the body. Therefore, ideally, air blowing should be done by two people, who can alternate every two to three minutes. If this is not possible, the number of breaths should be reduced every three minutes so that the person performing resuscitation normalizes the level of carbon dioxide in the body.
During artificial respiration, you should check every minute to see if the victim’s heart has stopped. To do this, use two fingers to feel the pulse in the neck in the triangle between the windpipe and the sternocleidomastoid muscle. Two fingers are placed on the lateral surface of the laryngeal cartilage, after which they are allowed to “slide” into the hollow between the sternocleidomastoid muscle and the cartilage. This is where the pulsation of the carotid artery should be felt.
If there is no pulsation in the carotid artery, chest compressions in combination with ID should be started immediately. Doctors warn that if you miss the moment of cardiac arrest and continue to perform artificial ventilation, it will not be possible to save the victim.
Features of the procedure in children
When performing artificial ventilation for babies under one year of age, the mouth-to-mouth and nose technique is used. If the child is older than one year, the mouth-to-mouth method is used.
Small patients are also placed on their back. For babies under one year old, place a folded blanket under their back or slightly raise their upper body, placing a hand under their back. The head is thrown back.
The person providing assistance takes a shallow breath, seals her lips around the child’s mouth and nose (if the baby is under one year old) or just the mouth, and then blows air into the respiratory tract. The volume of air blown in should be less, the younger the patient. So, in the case of resuscitation of a newborn, it is only 30-40 ml.
If a sufficient volume of air enters the respiratory tract, chest movement occurs. After inhaling, you need to make sure that the chest drops. If you blow too much air into your baby's lungs, this can cause the alveoli of the lung tissue to rupture, causing air to escape into the pleural cavity.
The frequency of insufflations should correspond to the breathing frequency, which tends to decrease with age. Thus, in newborns and children up to four months, the frequency of inhalations and exhalations is forty per minute. From four months to six months this figure is 40-35. In the period from seven months to two years - 35-30. From two to four years it is reduced to twenty-five, in the period from six to twelve years - to twenty. Finally, in a teenager aged 12 to 15 years, the respiratory rate is 20-18 breaths per minute.
Manual methods of artificial respiration
There are also so-called manual methods of artificial respiration. They are based on changing the volume of the chest due to the application of external force. Let's look at the main ones.
Sylvester's method
This method is most widely used. The victim is placed on his back. A cushion should be placed under the lower part of the chest so that the shoulder blades and the back of the head are lower than the costal arches. In the event that artificial respiration is performed using this method by two people, they kneel on either side of the victim so as to be positioned at the level of his chest. Each of them holds the victim’s hand in the middle of the shoulder with one hand, and with the other just above the level of the hand. Next, they begin to rhythmically raise the victim’s arms, stretching them behind his head. As a result, the chest expands, which corresponds to inhalation. After two or three seconds, the victim’s hands are pressed to the chest, while squeezing it. This performs the functions of exhalation.
In this case, the main thing is that the movements of the hands are as rhythmic as possible. Experts recommend that those performing artificial respiration use their own rhythm of inhalation and exhalation as a “metronome”. In total, you should do about sixteen movements per minute.
ID using the Sylvester method can be performed by one person. He needs to kneel behind the victim’s head, grab his arms above the hands and perform the movements described above.
For broken arms and ribs, this method is contraindicated.
Schaeffer method
If the victim's arms are injured, the Schaeffer method can be used to perform artificial respiration. This technique is also often used for the rehabilitation of people injured while on the water. The victim is placed prone, with his head turned to the side. The one who performs artificial respiration kneels, and the victim’s body should be located between his legs. Hands should be placed on the lower part of the chest so that the thumbs lie along the spine and the rest rest on the ribs. When exhaling, you should lean forward, thus compressing the chest, and while inhaling, straighten, stopping the pressure. The elbows are not bent.
Please note that this method is contraindicated for fractured ribs.
Laborde method
The Laborde method is complementary to the Sylvester and Schaeffer methods. The victim's tongue is grabbed and rhythmically stretched, imitating breathing movements. As a rule, this method is used when breathing has just stopped. The resistance of the tongue that appears is evidence that the person’s breathing is being restored.
Kallistov method
This simple and effective method provides excellent ventilation. The victim is placed prone, face down. A towel is placed on the back in the area of the shoulder blades, and its ends are passed forward, threaded under the armpits. The person providing assistance should take the towel by the ends and lift the victim’s torso seven to ten centimeters from the ground. As a result, the chest expands and the ribs rise. This corresponds to inhalation. When the torso is lowered, it simulates exhalation. Instead of a towel, you can use any belt, scarf, etc.
Howard's method
The victim is positioned supine. A cushion is placed under his back. Hands are moved behind the head and extended. The head itself is turned to the side, the tongue is extended and secured. The one who performs artificial respiration sits astride the victim’s thigh area and places his palms on the lower part of the chest. With your fingers spread, you should grab as many ribs as possible. When the chest is compressed, it simulates inhalation; when the pressure is released, it simulates exhalation. You should do twelve to sixteen movements per minute.
Frank Eve's method
This method requires a stretcher. They are installed in the middle on a transverse stand, the height of which should be half the length of the stretcher. The victim is placed prone on the stretcher, the face is turned to the side, and the arms are placed along the body. The person is tied to the stretcher at the level of the buttocks or thighs. When lowering the head end of the stretcher, inhale; when it goes up, exhale. Maximum breathing volume is achieved when the victim's body is tilted at an angle of 50 degrees.
Nielsen method
The victim is placed face down. His arms are bent at the elbows and crossed, after which they are placed palms down under the forehead. The rescuer kneels at the victim’s head. He places his hands on the victim’s shoulder blades and, without bending them at the elbows, presses with his palms. This is how exhalation occurs. To inhale, the rescuer takes the victim’s shoulders at the elbows and straightens, lifting and pulling the victim towards himself.
Complex of resuscitation measures
If the victim lacks consciousness, breathing, pulse, the skin is bluish, and the pupils are dilated, you should immediately begin to restore the vital functions of the body by performing artificial respiration and external cardiac massage . It is necessary to note the time of cessation of breathing and blood circulation in the victim, the time of the start of artificial respiration and external cardiac massage , as well as the duration of resuscitation measures and report this information to the arriving medical personnel.
Artificial respiration.
Artificial respiration is carried out in cases where the victim is not breathing or breathing very poorly (rarely, convulsively, as if with a sob), and also if his breathing is constantly deteriorating, regardless of what caused it: electric shock, poisoning, drowning, etc. etc. The most effective method of artificial respiration is the “mouth to mouth” or “mouth to nose” method, since this ensures that a sufficient volume of air enters lungs .
The “mouth to mouth” or “mouth to nose” method is based on the use of air exhaled by the person providing assistance, which is forcibly supplied into the victim’s respiratory tract and is physiologically suitable for the victim’s breathing. Air can be blown through gauze, a scarf, etc. This method of artificial respiration allows you to easily control the flow of air into lungs by the expansion of the chest after inflation and its subsequent collapse as a result of passive exhalation.
To carry out artificial respiration, the victim should be laid on his back , unfasten clothing that restricts breathing and ensure the patency of the upper respiratory tract, which in the supine position and in an unconscious state is closed by a sunken tongue. In addition, there may be foreign contents in the oral (vomit, sand, silt, grass, etc.), which must be removed with the index finger wrapped in a scarf (cloth) or bandage , turning the victim’s head to the side.
After this, the person providing assistance is located on the side of the victim’s head, puts one hand under his neck , and with the palm of the other hand presses on the forehead, throwing his head back as much as possible. In this case, the root of the tongue rises and frees the entrance to the larynx, and mouth opens. The person providing assistance leans towards face , takes a deep breath with an open mouth , then completely tightly covers the victim’s open mouth and exhales vigorously, blowing air into his mouth ; at the same time, he covers nose with his cheek or the fingers of his hand on the forehead. In this case, be sure to observe the victim’s chest, which should rise. As soon as the chest rises, the air injection is stopped, the person providing assistance raises his head, and the victim exhales passively. In order for the exhalation to be deeper, you can gently press your hand on the chest to help the air leave lungs .
If the victim’s pulse is well determined and only artificial respiration is necessary, then the interval between artificial breaths should be 5 s, which corresponds to a breathing rate of 12 times per minute.
In addition to the expansion of the chest, a good indicator of the effectiveness of artificial respiration can be the pinking of the skin and mucous membranes, as well as the emergence of the victim from an unconscious state and the appearance of independent breathing.
When performing artificial respiration, the person providing assistance must ensure that the blown air enters the lungs and not stomach . If air gets into the stomach , as evidenced by bloating stomach ,” gently press the palm of your hand on the stomach between the sternum and the navel . This may cause vomiting, so it is necessary to turn the victim's head and shoulders to one side (preferably to the left) to clear his mouth and throat .
If the victim’s jaws are clenched tightly and it is not possible to open his mouth , artificial respiration should be performed using the “mouth to nose” method.
For young children, air is blown into the mouth and nose . The smaller the child, the less air he needs to inhale and the more often he should inflate compared to an adult (up to 15-18 times per minute).
When the first weak breaths appear in the victim, artificial respiration should be timed to coincide with the moment he begins to inhale independently.
Stop artificial respiration after the victim has restored sufficiently deep and rhythmic spontaneous breathing.
You cannot refuse to provide assistance to the victim and consider him dead in the absence of such signs of life as breathing or pulse. Only a medical professional has the right to make a conclusion about the death of the victim.
External cardiac massage.
The indication for external cardiac massage is cardiac arrest, which is characterized by a combination of the following symptoms: pallor or cyanosis of the skin, loss of consciousness, absence of a pulse in the carotid arteries , cessation of breathing or convulsive, irregular breaths. cardiac arrest , without wasting a second, the victim must be laid on a flat, hard base: a bench, the floor, or, in extreme cases, a board placed under his back .
If one person is providing assistance, he is located on the side of the victim and, bending over, makes two quick energetic blows (using the “mouth to mouth” or “mouth to nose” method), then unbends, remaining on the same side of the victim, palm Places one hand on the lower half of the sternum (stepping two fingers higher from its lower edge), and lifts the fingers. He places the palm of his second hand on top of the first across or lengthwise and presses, helping by tilting his body. When applying pressure, your hands should be straightened at the elbow joints .
The pressure should be applied in quick bursts so as to displace the sternum by 4-5 cm, the duration of pressure is no more than 0.5 s, the interval between individual pressures is no more than 0.5 s.
During pauses, the hands are not removed from the sternum (if two people are providing assistance), the fingers remain raised, and the arms are fully straightened at the elbow joints .
If the revival is carried out by one person, then for every two deep blows (inhalations) he makes 15 pressures on the sternum, then again makes two blows and again repeats 15 pressures, etc. In a minute it is necessary to make at least 60 pressures and 12 blows, i.e. i.e. perform 72 manipulations, so the pace of resuscitation measures must be high.
Experience shows that the most time is spent on artificial respiration. Insufflation should not be delayed: as soon as the victim’s chest expands, it must be stopped.
When external cardiac massage , each pressure on the sternum causes a pulse to appear in the arteries .
Those providing assistance should periodically monitor the correctness and effectiveness of external cardiac massage by the appearance of a pulse in the carotid or femoral arteries . cardiac massage for 2-3 seconds every 2 minutes to determine the pulse in the carotid artery .
If two people are involved in resuscitation, then the pulse in the carotid artery is controlled by the one who performs artificial respiration. The appearance of a pulse during a break in the massage indicates the restoration of heart (the presence of blood circulation). In this case, you should immediately stop cardiac massage , but continue artificial respiration until stable spontaneous breathing appears. If there is no pulse, you must continue to perform cardiac massage .
Artificial respiration and external cardiac massage must be carried out until the recovery of stable independent breathing and cardiac in the victim or until he is transferred to medical personnel.
A prolonged absence of a pulse when other signs of revitalization of the body appear (spontaneous breathing, constriction of the pupils, attempts by the victim to move his arms and legs , etc.) is a sign of cardiac . In these cases, it is necessary to continue to perform artificial respiration and cardiac massage on the victim until he is transferred to medical personnel.
Hardware artificial respiration methods
For the first time, hardware methods of artificial respiration began to be used back in the eighteenth century. Even then, the first air ducts and masks appeared. In particular, doctors proposed using fireplace bellows to blow air into the lungs, as well as devices created in their likeness.
The first automatic ID machines appeared at the end of the nineteenth century. At the beginning of the twenties, several types of respirators appeared at once, which created intermittent vacuum and positive pressure either around the entire body, or only around the patient’s chest and abdomen. Gradually, respirators of this type were replaced by air-injection respirators, which had less solid dimensions and did not impede access to the patient’s body, allowing medical procedures to be performed.
Best materials of the month
- Coronaviruses: SARS-CoV-2 (COVID-19)
- Antibiotics for the prevention and treatment of COVID-19: how effective are they?
- The most common "office" diseases
- Does vodka kill coronavirus?
- How to stay alive on our roads?
All ID devices existing today are divided into external and internal. External devices create negative pressure either around the patient's entire body or around his chest, thereby inhaling. Exhalation in this case is passive - the chest simply collapses due to its elasticity. It can also be active if the device creates a positive pressure zone.
With the internal method of artificial ventilation, the device is connected through a mask or intubator to the respiratory tract, and inhalation is carried out by creating positive pressure in the device. Devices of this type are divided into portable, intended for work in “field” conditions, and stationary, the purpose of which is long-term artificial respiration. The former are usually manual, while the latter operate automatically, driven by a motor.
Non-invasive ventilation
Over the past two decades, the use of non-invasive mechanical ventilation equipment has increased markedly. NIV has become a generally accepted and widespread tool for the treatment of acute and chronic respiratory failure both in hospitals and at home.
One of the leading manufacturers of medical respiratory devices is the Australian company ResMed
NIV - what is it?
Non-invasive ventilation refers to mechanical respiratory support without invasive access (ie, without an endotracheal or tracheostomy tube) using various known assisted ventilation modes.
The equipment supplies air to the patient interface through a breathing circuit. To provide NIV, various interfaces are used - nasal or oro-nasal mask, helmet, mouthpiece. Unlike the invasive method, the person continues to breathe on his own, but receives hardware support during inspiration.
When is non-invasive ventilation used?
The key to successful use of noninvasive ventilation is recognition of its capabilities and limitations, as well as careful patient selection (diagnosis and patient assessment). Indications for NIV are the following criteria:
- shortness of breath at rest;
- respiratory rate RR>25, participation of auxiliary respiratory muscles in the respiratory process;
- hypercapnia (PaC02>45 and its rapid increase);
- Ph level
- symptomatic lack of positive effect from oxygen therapy, hypoxemia and gas exchange disorders;
- increase in airway resistance by 1.5-2 times the norm.
To perform non-invasive ventilation, the patient must be conscious and able to follow the instructions of the doctors. There must be a clear prospect of stabilizing the patient within several hours or days after the start of respiratory support. Absolute contraindications for NIV are:
- coma;
- heart failure;
- respiratory arrest;
- any condition requiring immediate intubation.
Advantages of NIV
One of the advantages of non-invasive ventilation is the ability to carry out therapy at home.
Non-invasive ventilation allows you to help a patient with acute or chronic respiratory failure without resorting to endotracheal intubation or tracheostomy. The technique is simpler and more comfortable for the patient. Let us list the main advantages of NIV.
- A respiratory support session is easy to start and just as easy to complete.
- The patient retains the ability to speak, swallow, eat independently, and cough.
- The procedure does not cause complications that are possible with endotracheal intubation and tracheostomy, including mechanical damage to internal organs by the tube, bleeding, swelling of the glottis, infection of the respiratory tract, etc.
- The air passes through the respiratory tract, due to which it is humidified, purified and warmed naturally.
- NIV can be performed at an early stage of the disease, i.e. before the patient's condition becomes critical. This shortens the duration of treatment, reduces the number of complications, and also reduces the risk of readmission.
- In many cases, devices for non-invasive respiratory support can be used not only in a hospital, but also at home.
- There is no “respirator weaning” period after completion of treatment.
Non-invasive conscious ventilation also has some disadvantages and side effects. For example, it is impossible to apply high treatment pressure, because this leads to significant leakage from under the mask. There is no direct access to the respiratory tract, so it is impossible to sanitize it. It is also impossible not to mention the likelihood of aerophagia, aspiration of stomach contents and skin irritation in the areas where the contour is adjacent.
Non-invasive ventilation in CPAP and BIPAP modes
The terms CPAP and BIPAP are often used interchangeably with NIV. These are common methods of non-invasive respiratory support using special portable devices. Many modern ventilators used in intensive care units have the option of CPAP and BIPAP.
Portable respirators are low cost (relative to resuscitation stationary ventilators), and they effectively compensate for even high air leakage. But most often they do not provide advanced monitoring of the patient's condition in real time.
Most resuscitation respirators can operate in CPAP and BIPAP modes. But more often, portable devices are used to provide respiratory support to a conscious patient.
In CPAP (continuous positive airway pressure) mode, the device supplies air under constant positive pressure, and the patient breathes spontaneously (i.e., independently). The method is used in the management of patients with moderate to severe obstructive sleep apnea syndrome (OSA), as well as post-traumatic or postoperative acute respiratory failure.
Bi-level positive airway pressure (BIPAP) devices have a wider range of applications and different mode options. Unlike CPAP, they involve an increase in pressure as you inhale and a decrease in pressure as you exhale. Thanks to this, it becomes possible to use high treatment pressure, but the patient does not experience discomfort in the exhalation phase, overcoming the resistance of the air flow. Two-level ventilation allows you to relieve the respiratory muscles, reduce the respiratory rate and increase the tidal volume. And the presence of auxiliary modes in modern models helps to select the optimal treatment protocol in accordance with the diagnosis and needs of the patient.
CPAP and BIPAP machines to help patients with COVID-19
Over the past few months, the issue of mechanical ventilation has been raised frequently in connection with the COVID-19 pandemic. High demand for ventilators has caused their shortage. The Australian company ResMed, as a manufacturer of medical respirators, is taking the necessary measures to prioritize the production of devices to assist patients with severe respiratory failure. But due to the acute shortage of equipment at the moment, alternative ventilation options, incl. non-invasive respiratory support.
The COVID-19 pandemic has led to a shortage of ventilators. In this regard, primary care for patients with coronavirus infection and symptoms of acute respiratory failure can be carried out using CPAP and BIPAP machines.
CPAP and bipap therapy can be used to provide primary care to patients with COVID-19 who require respiratory support. According to clinical protocols and reports received from clinicians in Italy and China, non-invasive ventilation (including BPAP and CPAP) for patients with COVID-19 is recommended in the following scenarios.
- To provide respiratory support to patients with respiratory failure who have not yet progressed to more severe hypoxemia.
- To facilitate extubation and recovery after invasive ventilation.
- To reduce hospital stays by allowing patients who still require respiratory support and rehabilitation to transition to home care.
NIV cannot replace invasive ventilation in the most severe forms of COVID-19. But this therapy is important when triaging patients in medical institutions. CPAP and BIPAP machines provide supplemental oxygen for less severe cases and reduce dependence on invasive ventilation. In addition, they are relevant for countries where hospital bed capacity turned out to be insufficient during the ongoing pandemic.
The following ResMed brand devices are suitable for home therapy: Lumis series BIPAP devices, as well as the AirCurve 10 CS PaceWave servo ventilator. They can be connected to additional oxygen (up to 15 l/min), as well as a module with a pulse oximetry sensor to monitor blood oxygen saturation.
Long-term use of non-invasive ventilation: benefit or harm
There is an opinion that the longer a patient is on a ventilator, the more difficult it is for him to refuse a respirator. This gives rise to the fear of “forgetting how” to breathe without a device and the fear of suffocation if the device turns off for some reason. But such risks occur only with invasive ventilation, when the device literally breathes instead of the patient. In turn, long-term use of non-invasive ventilation does not cause addiction, because the patient breathes on his own, and medical equipment only helps him with this.
According to research results, long-term non-invasive respiratory support (including at home) can optimize gas exchange, reduce the load on the respiratory system and reduce the risk of subsequent hospitalizations in patients with COPD. One of the advantages of long-term NIV is the ability to provide rest to the respiratory muscles, which are in a state of chronic fatigue.
Long-term use of non-invasive ventilation improves sleep quality and well-being while awake. When NIV is discontinued even for a week, patients with chronic respiratory failure begin to have morning migraines again, shortness of breath appears, and their night saturation also worsens.
NIV for chronic respiratory failure is most often performed at night. First, it increases the total time of respiratory support. Secondly, it helps eliminate nocturnal hypoventilation and episodes of desaturation, which most often occur in the REM phase of sleep.